Turn your Mac's internet connection into a Wi-Fi hotspot without any software

How to share your Mac's internet connection with your iPhone or iPad

Before beginning, be aware that Internet Sharing works for any computer running OS X Lion (10.6) or later.
  1. Click on the  icon in the top menu bar and select System Preferences.
  2. Now click on Sharing.
  3. Click on Internet Sharing and then tick the checkmark next to Wi-Fi.
  4. Now turn on Internet Sharing by clicking the tick mark next to Internet Sharingin the sidebar.
  5. Click Start on the menu that pops up in order to turn Internet Sharing on.
Your Mac should now show up as a Wi-Fi hotspot for your iPhone, iPad, and similar devices. Simply connect to it like you would any other Wi-Fi network. You can even change the name of your Mac in the same Internet Sharing menu to make it easier to find if you'd like.
Have you used Internet Sharing to turn your Mac into a WiFi hotspot? Where were you that you had to resort to Internet Sharing? Let me know in the comments!


Source : 

How to turn your Mac's internet connection into a Wi-Fi hotspot with Internet Sharing | iMor

How to Install Google Play Store on Blackberry Leap, Z30 and Z10

Here is a very good method to install Google on my Blackberry Z10 device and was installed successfully .

Unlike before, you would need to sideload any apk app to successfully install the app, but with your blackberry 10 devices, like blackberry leap, Z30, and Z10, I don't think you would be needing that process again.

The below method is a direct method that works perfectly, and make sure you have successfully updated the OS of your blackberry to 10.2.1 or above.


Guide to install Google Play Store on Blackberry 10 Devices

 Firstly, download the following apk files on your blackberry, via their links provided below;


 After downloading the above APK files, don't run them immediately, just install them. 

 After that, First run the Google play store, and you would be requested to login with a new or an already existing account, don't perform any action, simply close the app.

 After that, run the Blackberry Google ID, and register your device with your Google Play store ID.

 Now go back to your Google Play store, and login with the Google ID that you made use of in the previous step and that's it.

You've successfully install the Google Play store on Blackberry 10 devices like Blackberry Leap, Z10 and Z30.


All thanks to Colbalt 232 of Crackberry. You can check back on the source link for more updated version of Google Play store.


Source : How to Install Google Play Store on Blackberry Leap, Z30 and Z10 - The Genesis Of Tech:


هل حقاً مجموع 2+2 يكون 5 ؟

هذا فيديو معبر جداً عن طريقة طمس   و تغيير الحقائق .
شكراً للاستاذ / احمد عجمي 

Customize date merge fields word !

Mail Merge: Reformat Date, Time and Number fields imported from Excel
When date, time or number fields are imported from Excel to a Word mail merge document the formatting reverts to general format, as defined in the BIOS of your computer, eg date fields display as mm/dd/yy. You can reformat them in the Word mail merge document and the changes you make will remain in the document. Follow the steps outlined in this article to reformat them.

Date Fields imported from an Excel file to a Mail Merge document 

  1. In the Word mail merge document, select the imported date field.
  2. Right click over the selected field and choose Edit Field... from the menu commands to open the Field dialogue box.
  3. Click on the Field Codes button (bottom left of Field dialogue box)
  4. At Advanced Field Properties (top right of dialogue box) you will see a box with information similar to the text below

    MERGEFIELD StartDate
  5. Type the following after the name of the field

    \@ "dd-MMM-yy" to see date in the format 25-Feb-10
    \@ "dd/MM/yyyy" to see the date in the format 25/02/2010
    \@ "dd MMMM yyyy" to see the date in the format 25 February 2010
    \@ "dddd, dd MMMM yyyy" to see the date in the format Friday, 25 February 2010

    There are others, experiment if you want other date formats.

    The box should now look similar to this: MERGEFIELD StartDate \@ "dd-MMM-yy"
  6. Click on the OK button on the Field dialogue box.
The document will remember the format you have given the date, so when you run the mail merge again you do not have to repeat the procedure.

Time Fields imported from an Excel file to a Mail Merge file

  1. In the Excel document, make sure that the time is entered correctly, eg 13:45, you may find it formats itself as a date, in which case you should highlight all of the cells that will hold time values, click on the Format menu and select Cells. On the dialogue box with the number tab selected, choose the custom category and scroll through the custom formats and select hh:mm - this will format the time correctly.
  2. In the Word document, select the imported time field.
  3. Right click over the selected field and choose Edit Field... from the menu commands to open the Field dialogue box.
  4. Click on the Field Codes button (bottom left of Field dialogue box)
  5. At Advanced Field Properties (top right of dialogue box) you will see a box with information similar to the text below

    MERGEFIELD Arrival Time
  6. Type the following after the name of the field

    \@ "HH:mm" to see time in the format 13:45
    \@ "HH:mm:ss" to see the time in the format 13:45:30
    \@ "h:mm AM\PM" to see the time in the format 1:45 PM
    \@ "h:mm:ss AM\PM" to see the time in the format 1:45:30 PM
    The box should now look similar to this: MERGEFIELD Arrival Time \@ "HH:mm"
  7. Click on the OK button on the Field dialogue box.
The document will remember the format you have given the time, so when you run the mail merge again you do not have to repeat the procedure.

Number Fields imported from an Excel file to a Mail Merge document

  1. In the Excel document, make sure that the number is a numeric value, and not a text value.
  2. In the Word mail merge document, select the imported number field.
  3. Right click over the selected field and choose Edit Field... from the menu commands to open the Field dialogue box.
  4. Click on the Field Codes button (bottom left of Field dialogue box)
  5. At Advanced Field Properties (top right of dialogue box) you will see a box with information similar to the text below

    MERGEFIELD HireFee
  6. Type the following after the name of the field

    \# "0.00" to see number in the format 1234.50

    \# "#,##0.00;- #,##0.00" to see positive number in the format 1,234.50 and negative number in the format -1,234.50

    \# "£#,##0.00;- £#,##0.00" to see positive number in the format £1,234.50 and negative number in the format -£1,234.50
  7. The box should now look similar to this: MERGEFIELD HireFee \# "#,##0.00;- #,##0.00"
  8. Click on the OK button on the Field dialogue box.
The document will remember the format you have given the number, so when you run the mail merge again you do not have to repeat the procedure.
Applies to: Word 2002, 2003 and 2007, does not apply to previous versions.
Source : http://www.ashbee.co.uk/index.php/faq/48-word/97-mail-merge-reformat-date-time-and-number-fields-imported-from-excel

Excel 2007 shows cell reference,Formula not value

Once in a while everyone is bound to come across this problem. You type a formula in a cell, then you press ENTER. Bam! nothing happens. You check if a donut chunk went in to the key board and some how jammed the ENTER key. So press it again, this time harder. But nothing. The formula shows up in the cell instead of the result, like this:
Excel Formulas are not working?!? What to do when all you see is the formula, not result
Now what to do?
Of course, you can be careful when eating donuts. But careful donuts sure sounds like a paradox. So instead lets roll up our sleeves and find out the reason for this mishap.

The top reason for formulas are shown as formulas instead of results:

You may have accidentally pressed CTRL+` (back quote symbol, the key below escape key in your keyboard) or activated the “Show Formulas” mode in Excel.
When you do it, excel shows the formulas instead of their results.
To fix this error and get back the values (or results) just press CTRL+` again.

The next reason why formulas are shown as formulas:

You may have set the cell formatting to “Text” and then typed the formula in it.
When you set the cell formatting to “Text”, Excel treats the formula as text and shows it instead of evaluating it.
To fix this error, just select the cell, set its formatting to “General”. Now edit the formula and press enter. (Alternatively you can press F2 and then Enter after setting format to General).

The less probable reason why formulas are shown as formulas instead of values:

You may have accidentally typed a single quote ‘ before the = sign in the formula.
When you type single quote ‘ in a cell excel treats the cell contents as text and does not evaluate any formulas within.
To fix this error, just remove the single quote.

مولد السيد ( العادي)

ولد السيد (العادي) سنة 1901م
وكانت درجاته الدراسية دون المتوسط ،
وتزوج الآنسة (متوسطة) في سنة 1924م
ورزق بطفل سماه (العادي الابن)
وابنة سماها (العادية)
... قضى أربعين سنة في أمور غير ذات قيمة أو نفع ،
وشغل عددا من المراكز التافهة.
لم يجرب أبداً أية مخاطرة أو فرصة،
وتعمد ألا يطور مواهبه ،
ولم يتعاط مع أحد في أي شيء كان،
كان شعاره المفضل
(( لا دخل لي في هذا ! ابعد عن الشر وغن له))

عاش 60 سنة بدون هدف ولا خطة ولا رغبات ولا ثقة ولا عزم أو تصميم،
كتبوا على قبره :
هنا يرقد السيد ((العادي))
ولد سنة 1901م ومات سنة 1961م،
لم يحاول أبداً أن يفعل أي شيء ،
طلب من الحياة القليل ،
ودفعت الحياة ثمنه!
لا تدع الحياة تفرض عليك ما تريد , تمرد وافعل أنت ما تريد....ولا تدع الدنيا تطلق عليك انك...*بقايا إنسان *
مما أعجبني نقله......للسيد العادي 
الرابط

Computer Restarted Unexpectedly 100% FIX

Windows 7 "computer restarted unexpectedly or encountered an unexpected Error"


here is the solution I found it and it was very helpful in the following video :


Computer Restarted Unexpectedly 100% FIX - YouTube:


'via Blog this'

Enable (hack) BlackBerry Browser without BIS/BES

This simple hack enables Blackberry default browser to use a normal internet plan instead of a costly dataplan or enables the browser for those who don’t have a dataplan. All you require is to get a cheaper normal GPRS/3G plan and configure the TCP/IP option in your blackberry. This hack in no way will affect your Push-mail and messaging services and you can always revert to the previous state easily too. So the following people are benefited with this hack:
· For all those using blackberry without a dataplan, they cannot access or use the default blackberry browser. Without access to the browser they wont be able to do an OTA install of apps or install the Blackberry ‘AppWorld’.
· In some countries, the Blackberry Dataplan is very costly. So using it to download apps and browsing will burn their pockets. These people will be benefited if they could access Browser using normal GPRS/3G plan which is way cheaper.
Follow these steps to do it:
First we need to enable legacy restore mode. To do that:
· Go to Options > Advanced Options > Service Book.
· For QWERTY models hold ALT and press ‘S’ ‘B’ ‘E’ ‘B”. For Sure-type (1/2 qwerty) models hold ALT and press ‘S’ ‘S’ ‘B’ ‘E’ ‘B’ & for touch screen models hold [!?123] until it show lock icon and press 4 ? 2 ? – means ALT ‘S’ ‘B’ ‘E’ ‘B’.
· You will then see the message "Legacy SB Restore Enable".
After that you are free to backup/Restore Service Book on your BlackBerry.
Now download this file: http://www.box.net/shared/j6lp6cii8g
It is a backup file(.ipd) which can be used to restore a specific service book. Now follow these steps
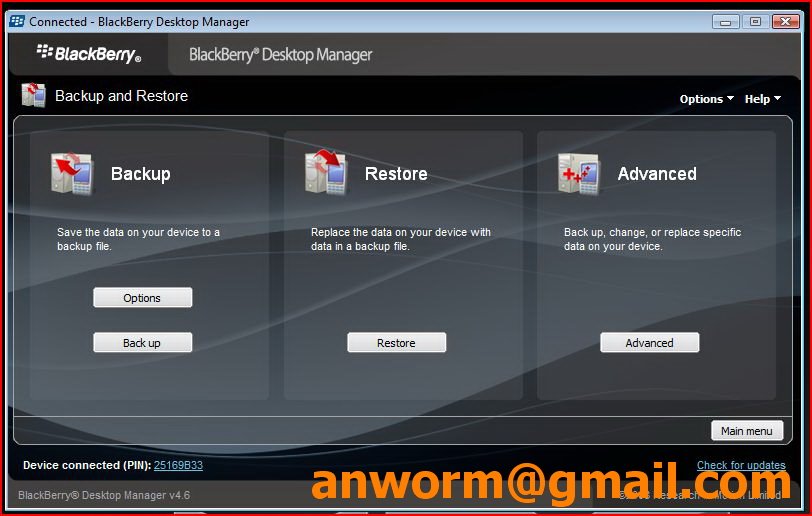
· Open Blackberry Desktop Manager.
· Select Backup and Restore, you will see main options, as follows:
· Click Advanced button. In Advanced option, click File. A drop down menu appears and then click Open. Now select the backup file that we downloaded.
· Then select Service Book at the left column and click ‘>>‘ button.
· After that, disconnect the phone from the PC and then goto Options >Advanced Options > Service book on your phone. And make sure there is Service Book with name ‘Browser Config [BrowserConfig]’ is there.
· Now you have to configure the browser to use this Service book. To do gotoOptions > Advanced Options > Browser and check if ‘Browser’ is selected as shown in the image below.
· Now go to your Blackberry Desktop. Voila…. there is your Browser icon.
· Next step is that you need Access Point in Options > Advanced Options >TCP. Fill those fields. If you don’t have those info’s, contact your service provider and ask them.
· Restart your phone and run Browser. Enjoy your new freedom. To install AppWorld, goto http://www.blackberry.com/appworld/download from your Blackberry Browser.
Troubleshooting:
· If you see the Browser icon, You have Service Book on your phone. If theBrowser doesn’t work, go to Options Advanced Options > Browser and check if ‘Browser’ is selected. Then back to Home and try Browser again. with some lucky it will work
· If your BlackBerry have IT-Policy. Try to remove IT-Policy first and then Enable Browser.
· If you are still stuck somewhere, try reintalling the Blackberry OS(Upgrade or Downgrade) then retry this hack.
If this hack worked for you, please Comment, Facebook Like or Retweet this post. Let the world know.
Posted by Akhil


Enable (hack) BlackBerry Browser without BIS/BES | Ishmael's - The Financial Risk Studio...:


'via Blog this'

GNS3 Nodes Dont Save Config - The Cisco Learning Network

GNS3 Nodes Dont Save Config

This question is Not Answered.
FARZADMember 3 Star
    Hi All !
    I have been using GNS3 since last one year successfully. All of a sudden today when I created a new lab (which have total 14 nodes of having IOS 3700) nodes have stopped saving the config. after shutdown or reboot. Some nodes are even not saving basic config. of passwords & banners and some are saving basic but not interface config. Please suggest a solution or a reason why its happening. Thanks

    This is a great error faced me for three days.
    The answer is :
    I will add that I in general will first issue wr command to save the configuration files in each router first.

    then I save the project file.

    This makes sure I don't lose any configurations.

    Move iPhone contacts to any Android

    Assalamo Alikom again...


    Yesterday a colleague asked me to move contacts of  IPhone 5s to new Samsung mega device.

    I tried installing an application called Sync4iCloud contacts from Google Play but it did not work at all.


    Then After many and many search tries I could get it :-)


    Here is how to move your IPhone contacts to android:


    #1 Login to your iCloud Account from iPhone

    #2 Make sure your data  has been synced fully to iCloud

    #3 Login to your iCloud Account from web browser

    #4 Click Contacts icon , wait until it loads , if you get error message try again to open it (keep patience)

    #5 Below left click gear icon and click select all

    #6 Click Export Vcard  , copy the downloaded file to SDCard

    #7 You are done....

    #8 Back to your Android device ...Open Contacts , from Menu choose import/Export

    #9 Now lookup file in SDCard  and choose it.

    #10 You are done again...


    Bye...

    Update:
    It may does not works when you import exported Vcard to Google or Android and you will get Error message.
    So you are to convert Vcard to CSV using this great online tool: http://labs.brotherli.ch/vcfconvert/
    Then import your converted CSV to Android .

    VLC : Continue the playback where left off

    VLC is the greatest media player because it's free and play any media file.

    One of the best tricks I have recently found in version 2.2.1 is saving position of playing media where I left off.


    It's very useful when I watching my CCNA lessons.


    To enable this feature :

    Tools / Preferences / Interface / Main Interfaces / Qt / Continue Playback? (Always)


    Source : Reddit.com

    حمل من ISSUU مجانا بدون برامج

    موقع Issuu من المواقع ذائعة الصيت لنشر الكتب بصيغة PDF.
    لا يسمح الموقع بتحميل محتوياته و معروضاته من المستندات الا انه يمكن ذلك بواسطة برامج منتشرة على الانترنت.
    من أفضل المواقع التي وجدتها على الاطلاق للقيام بهذه المهمه هو موقع http://utilidades.gatovolador.net/issuu/.
    تعليمات و طريقة استخدام الموقع :
    #الموقع باللغة الإسبانية
    #يتم كتابة رابط المستند المراد تحميله في خانة :Issuu Display URL
    #كتابة أول صفحة نريد بدء التحميل من عندها  أمام خانة  :First Page
    #كتابة نهاية الصفحة التي نريد التحميل عندها  أمام خانة  :Last Page
    #بعد كل هذا نضغط زر Download 
    # لاحظ يتم تحميل المستند بصيغة الصور و التي يمكن تحويلها الى ملف PDF واحد دفعة واحدة عن طريق موقع http://smallpdf.com/ar


    موقع تحميل المستندات هو : http://utilidades.gatovolador.net/issuu/
    موقع  تحويل الملفات من و الى PDF هو : http://smallpdf.com/ar

    Import Google contacts to Blackberry OS 5,6,7

    After many tries to get my Google contacts directly to my Blackberry 9780.

    I found this very helpful application .

    You just need to Export Google Contacts as CSV.

    Then  download Contact Import/Export application.

    Click Menu then Choose import then Explore to SD card then OK.

    You are done.


    How to import your Facebook friends Birthday to Outlook 2013?

    Hello,

    How to import your friends birthday events from Facebook to outlook 2013.

    It's very easy as follow :


    #click Events on the left side of your homepage

    #At the bottom right below  right click Birthdays to export all upcoming birthdays and select Copy link address

    #Open Outlook  , Choose FOLDER tab 

    #Choose Open Calendar  then Choose From Internet...

    # Right click and choose Paste

    #You are done...


    enjoy....

    نقل جهات الاتصال من جوجل لنوكيا

    موضوع استيراد الأسماء/جهات الاتصال من جهاز اندرويد الى نوكيا :-(
    بعد كثير من محاولاتي الفاشلة ( النجاح سلسلة من التجارب الفاشلة) في نقل الاسماء من حساب جوجل الى جهاز نوكيا X2-01  ؛ و بعد عمليات البحث وجدت الحل يتلخص في الاتي :
    1# قم بعمل تصدير لجهات الاتصال من حساب جوجل  بصيغة CSV

    2# قم بتحميل برنامج VCardSplit من الموقع الرسمي للبرنامج او من على حسابي في جوجل درايف

    3# قم بفك ضغط برنامج VCardSplit في اي مكان و ليكن على سطح المكتب

    4# انشيء مجلد على الC اسمه Cont

    5# انسخ  VCardSplit.exe و ملف Contacts.csv (الذي سبق تصديره من جوجل خطوه رقم 1) داخل المجلد Cont

    6# من قائمة Start افتح Run  واكتب CMD ثم اضغط على مفتاح Enter

    7# داخل الشاشة السوداء التي ظهرت الان اكتب :
    cd C:/Cont ثم اضغط Enter

    8# اكتب  Vcardsplit.exe contacts.csv ثم اضغط Enter

    9#  بعد تحميل نوكيا سيوت من هنا و تثبيته على حاسبك الشخصي؛تأكد من توصيل الهاتف بالحاسب و تعرف النوكيا سيوت عليه

    10# من خلال نوكيا سيوت اضغط على ايقونة  الاسماء Contacts

    11# من قائمة ملف File اختر استيراد/Import contacts

    12# سيتم فتح صندوق حواري ؛ تصفح من خلاله حتى تصل للمجلد C:/cont

    13# اختر جميع الاسماء به من خلال الضغط على Ctrl+A من لوحة المفاتيح ثم ok

    14# الان تم استيراد جميع الاسماء الى نوكيا سيوت 
    فقط قم بعمل  مزامنه للاسماء ليتم نقلها لجهازك ؛ كالتالي :

    # من قائمة مزامنه/Sync اختر مزامنه الان/Sync Now  ثم اختر الاسماء/Contacts  

    # انتهى....

    [شكرا لموقع gloga]

    Root Galaxy ace plus GT-S7500

    I have just bought anew samsung Galaxy S7500 (300LE) ; It comes with android 2.3 pre-installed. and many applications I don't need.

    So I wanted to remove these pre-installed apps like : chaton , Gogle Talk ..etc
    I found the following article describes step by step...
    First of all you have to install the cwm recovery v 5.5.0.4:Download Odin3.zip and extract
    Download cwm-trebon.zip and extract
    Now Open Odin3 v1.85.exe
    "Auto Reboot" and "F.Reset Time" must be checked and "Repartion" must be UNCHECKED
    Now Click on PDA and select cwm-trebon.tar.md5 That you have extractedTurn Off your phone and Boot into Download Mode by Pressing Volume Down Key + Home Key + Power
    Press Volume Up to Continue
    Connect your Phone to PC
    Odin3 will detect your Phone and The ID:COM Box will turn yellow
    Now hit "Start" Button in odin to begin the Flashing progress
    After flashing is done the phone will reboot and you will see "PASS" in Odin
    CWM is now successfully installed and you can unplug your phone

    Follow these steps to root your device:
    Download the supersu package (SuperSu-Trebon-by-danyznd123.zip) and copy it to your external sdcard(DON'T EXTRACT)
    Boot your Phone in CWM mode by Pressing Volume Up + Volume Down + Home + Power
    Now in cwm press "Install zip from sdcard" than "choose zip from sdcard" and select the zip file SuperSu-Trebon-by-danyznd123.zip than "Yes" to install
    Wait until cwm finish the process and navigate to "Reboot System Now"

    That's It!Your ace plus is successfully ROOTED!!
    Note:The yellow triangle at boot is not important so ignore it.
    Press THANKS if i helped You!!
    Enjoy!!!
    Attached Files
    File Type: zipSupersu-Trebon-by-danyznd123.zip - [Click for QR Code] (1.21 MB, 15056 views)
    File Type: zipOdin3-v1.85.zip - [Click for QR Code] (198.9 KB, 7859 views)
    File Type: zipcwm-trebon.zip - [Click for QR Code] (4.69 MB, 18786 views)

    اطمئن على عينك عبر الانترنت مجاناً

     كل يوم يطل علينا   الاخ/ راغب أمين  باخبار جديدة و خدمات مجانية يمكننا القيام بها عبر الانترنت لتوفر علينا الكثيرمن الوقت و المال.
    اخر هذه الخدمات كانت بخصوص فحص العين عبرالانترنت ؛ ولان مقالة الاخ/ راغب أمين  كانت عبارة عن مقطع فيديو يقول ان الرابط يوجد في اخره المقطع.
    فلم اصبر حتى مشاهدة الفيديو و قمت بجولة في الويب للبحث عن فحوص مجانية  عبر الويب للاطمئنان على صحة عينيك.
    و وجدت موقعين :
    - الموقع الاول خاص بشركة كارل زيس الالمانية  و يقدم اختبار جيد و شيق و يقيس معايير نظر مختلفة(عبارة عن ثلاثة اختبارات) ؛ ثم في النهاية يقدم لك عدة نصائح و عما اذا كنت بحاجة لعدسات ام لا؟ [Online Vision Check]

    - الموقع الثاني و هو موقع  أجنبي مترجم يقدم اختبار واحد من ثلاثة من اختبارات كارل زيس السابقة.
    و يتميز انه يعطيك مقياس لحدة البصرة [اجراء فحص النظر]

    و هنا لاننسى وصية ابن القيم في زاد المعاد حيث أورد :
    قال الشافعي : أربعة تقوي البصر : الجلوس حيال الكعبة و الكحل عند النوم و النظر الى الخضرة و تنظيف المجلس
    و أربعة توهن البصر : النظر الى القذر و الى المصلوب و الى فرج المراة و القعود مستدبر القبلة

    اللهم متعنا بالنظر الى وجهك الكريم...امين

    طرق استرجاع هواتف XPERIA X8 X10 W8 بعد اخطاء تركيب الرومات

    بعد تثبيت روم غير رسمي على Xperia X8 حاولت الرجوع مره اخرى للروم الرسمي...
    وجدت الحل في هذا الموقع العربي http://www.startimes.com/f.aspx?t=31563965
    فلم أضطر  لتحميل ستوك روم او نحو ذلك ؛ كل ما هو مطلوب هو تحميل برنامج Sony PC من الرابط  ؛  , و توصيل الهاتف لترك البرنامج يقوم بدوره....

    Remove Ads from Kindle very easy....

    Amazon will probably drop a nuclear bomb on my house for this. Here’s how you can get a COMPLETELY AD-FREE Kindle 4 (non-touch) without paying a single extra cent to Amazon. Your Kindle will behave EXACTLY as though you purchased the Ad-free version.
    Tested on Kindle 4 non-touch with latest OS 4.0.1. Theoretically, should work on older OS 4.0 also. Actually, steps x to y were tested on a 4.0 device, but the steps before that were never done on the device (It was never connected to the internet before doing this hack.) Theoretically this may even work on the Touch and Touch 3G version and other ad-supported Kindles.
    START FROM STEP 1 if you have already connected to internet, registered your Kindle and thus got ad loaded on your Kindle.
    SKIP TO STEP 10 if you have never connected to internet since you got your Kindle (That is, your Kindle is currently behaving as “ad-free” without even the “Please connect wirelessly to download sponsored offers” message, and is currently unregistered.)
    It may seem lengthy but trust me it’s quick to do. Just give it a full read to mentally plan out what you have to do, then start doing it.
    1. Connect Kindle to PC and allow USB mode.
    2. Copy out the “documents” folder and any other content you may have loaded on your Kindle. [“Copy out” means copy to your computer’s hard disk so that you can copy them back later.]
    3. Disconnect the Kindle from the USB cable.
    4. Wake your Kindle if needed. From Home screen, press Menu, go to Settings.
    5. Press Menu button again, go to Reset to Factory Defaults.
    6. Press Right to select “OK” then press the center key of D-pad.
    7. After a few seconds, Kindle will restart. Be patient.
    8. When you see the Language selection screen, choose your desired language (by default “English (United States)” and select “OK”.
    9. A few more seconds later, you will see the “Set Up Your Kindle” screen. DO NOT FOLLOW THE INSTRUCTIONS ON THIS SCREEN! Not yet.
    10. Plug in your USB cable to Kindle and connect to your PC.
    11. Open the Kindle drive in your computer. If you did steps 1-9, you will find that the drive has been reformatted by Kindle and all your documents are now gone (including the dictionaries that Kindle came with!). This is why step 2 is important. If you skipped to step 10, your documents (if any) are not affected, and you must skip next step, go to step 13.
    12. (For those who did steps 1-9) Copy back the documents folder that you had copied out in step 2. You will be asked whether to replace two Kindle_User_Guide files. You can click “Don’t Copy” or say No to this question unless you want restore your last read page on the User Guide.
    13. Make sure hidden files can be seen by enabling the “Show hidden files, folders and drives” option.
    14. Open the “system” folder in your Kindle drive.
    15. Right-click an empty area and choose New > Text Document. Enter any alphabet to shorten the name to (for example) d.txt
    16. Go back to the Kindle drive, hold SHIFT on your keyboard and right-click the “system” folder.
    17. Choose “Open Command Window Here”
    18. In the black command window, enter the command “ren d.txt .assets” (no quotes, and replace d.txt with whatever filename you chose in step 15). Press ENTER key after typing command. Close command window once done. (IMPORTANT: Make sure you get the file name right, or you will have to start from step 1 again, even if you had skipped steps 1-9.)
    19. Open the system folder again, and right-click the .assets file, choose Properties.
    20. Place a checkmark on the “Read-only” option and click OK. (This step may not be necessary, but I did it so I’m mentioning it. You’re welcome to test without it and post your results.)
    21. Eject your Kindle and disconnect the USB cable.
    22. NOW is the time to “Set Up Your Kindle”. First of all, connect to a WiFi (internet). Once connected, register to your Amazon account.
    23. Once registration is complete, press the Home button (unless you wanna shop or read user guide, but you probably don’t wanna do that now).
    24. SURPRISE! No ads! Not convinced? Go to the Experimental Web browser and do some good amount of surfing. Go back to Home screen. STILL NO ADS! Awesome, huh? Not even the “Please connect wirelessly to download sponsored offers” banner! You won’t even find the “View Special Offers” option in the menu. Your screensavers will also have the same effect.
    25. Final step: Go to Settings and set the time, and ensure that your dictionary and other settings are set correctly and to your preference.
    Enjoy your ad-free Kindle at ad-supported Kindle’s price!
    Thanks : Anon7788990